Tuesday, August 31, 2010

Chicken- Two Ways Plus More!

Last week we had a very busy week working on replacing our roof. My husband Paul and my Dad Dale worked on the roofing project all week while my Mom and I helped clean up the old roofing debris, ran errands, took care of my son Adam and cooked meals.

One of the meals we cooked was beer can chicken along with a salad of lettuce and potatoes- both from our garden! Since this year has not been the best for our garden it was nice to harvest a bit and enjoy it last week!


Above are the potatoes that we harvested, boiled and served with a bit of butter, salt and pepper.

I have made beer can chicken before on the barbecue and it was good, but this one turned out particularly tasty! And, as a bonus we made a lovely chicken salad out of the leftover chicken for lunch the next day. It was great to have plenty of hearty and healthy food for a hungry roofing crew!

The recipes for the Beer Can Chicken and Condiment Chicken Salad that we made follow along with my notes. Tonight I am making a chicken soup out of the chicken stock I made from the bones and bits of leftover chicken from these two meals. So, we got 2 meals out of 1 large chicken plus a bit more!! I'll post that recipe later. In the meantime, enjoy these two meals!

Beer Can Chicken:

1 large chicken- 6+ pounds
5-6 tablespoons spice rub ( I used a spice mix I already had and added a bit of brown sugar to it)
1 large & tall can of beer

1. Wash chicken with cold water and blot dry with paper towels.

2. Rub chicken with3-4 tablespoons spice rub outside and inside the cavity. Make sure to take out the giblets or giblet packet.

3. Open the tall beer can and also poke a few holes in the top using a bottle opener. Pour out the first inch or so of beer. Spoon the remaining spice rub into the can of beer. It will foam a bit.

4. Place the chicken onto the can of beer and make sure it can stand upright.

5. Heat your barbecue to high heat at first. Place the chicken on a roasting pan as seen in the picture above. Make sure that you can close the lid of the barbecue over the chicken. Reduce the heat to medium or low. Check your chicken often and lower the temperature if the skin is burning quite a bit.

6. Cook the chicken for an hour + or until the internal temperature reaches around 181F.

Slice, serve and enjoy!


Chicken Salad for Lunch:


The next day we had this lovely chicken salad for lunch! It is a recipe that has been in my family for a long time. We have always served it for summer barbecues or special occasions in the summer months. I love it because it is simple to make yet very special for company. We have reduced the amount of mayonnaise in our version from the original because it seemed to be too heavy. However, you may add more to your taste.

Here is the recipe:

Condiment Chicken Salad:

1/2 cup + of mayonnaise
1 cup raisins
1 cup salted peanuts
1 cup mango chutney (my Mom often uses the kind she makes herself)
1 cup flaked coconut
2 pounds cooked chicken, diced coarsely
1 cups bananas- sliced
1/2 teaspoon salt
2 avocados, sliced
1 banana sliced
6 romaine lettuce leaves
1 tablespoon lemon juice

Mix together mayonnaise, raisins, peanuts, chutney, coconut, chicken and salt. If making ahead, cover and chill at this point. Just before serving, gently combine with the two cups sliced bananas. Line the salad bowl (or put on a plate) with lettuce leaves and mound salad on top. Garnish with slices of avocado (or you can mix those in as we did above) and banana that have been dipped in lemon juice.


Enjoy these two meals from one chicken!

Monday, August 30, 2010

Burgers All Dressed Up

Since Labor Day is coming up and it is a popular time to have a barbecue and get together with family and friends- it is a good time for this burger recipe that has been a family favorite for a long time!

I actually served these fancy burgers for my Dad's birthday earlier in August this year, but since I have been busy with many projects- including helping out with roofing our house (doing the clean up, etc.) I am finally getting around to posting this!

We served this meal using the freshest, most local and in season ingredients we could find- from local grass fed beef, heirloom tomatoes, green onions, parsley, sweet corn and sourdough french bread loaves from our farmer's market to the fresh eggs used in the deviled eggs from my parent's chickens as well as a local blue cheese! Our favorite is the Caveman from Rogue Creamery. It was a summer meal at its best!!

These burgers are so special, yet so easy!

Here's the recipe that serves 6 people:

Noveau Riche Hamburgers:

2 pounds of grass fed ground beef
1/8 cup chopped parsely
1/4 cup chopped green onions
1/2 tablespoon salt
1/8 teaspoon pepper
1 cup red wine
4-5 ounces crumbled blue cheese

2-3 sourdough French baguettes

Optional Toppings:

-tomatoes
-lettuce
-ketchup
-mustard
-relish
-caramelized sweet onions

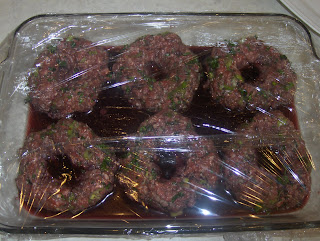
Mix together meat, parsley, onion, salt and pepper. Divide into 6 third-pound patties, making a depression in the center of each one. Place in a shallow pan and pour wine over patties, pouring into the depressions. Chill 2 hours or longer.


Remove patties from marinade and grill over medium hot coals on a charcoal grill to taste (8-10 minutes for medium rare) or over a gas grill to taste. When the burgers are almost done cooking- put the crumbled blue cheese on top of the patty and let it melt a bit.

Serve the burgers on sliced French bread loaves and serve with condiments as desired.


Enjoy your burgers!

Tuesday, August 24, 2010

Early Harvests


In the last couple of weeks we have started to harvest a few things in the garden and around it. Last Monday, August 16th Adam and I came out for the day to pick blackberries at my parent's place. Adam had fun with his own bucket full of berries- mostly supplied by me and Grandma!


We found a large grove of blackberries and my Dad mowed around the area and cut back a lot of them so that they were easy to get at. We managed to get a large bucketful. There will be many more ripe ones in the days to come! Below is a picture of our first berry harvest.


I took home this large bucket of berries and saved some for eating and then froze them on a tray to save for winter. I hope to get out to do more picking later on and freeze some more. We also are thinking about making some blackberry syrup and other things with the berries.

Other Garden Harvests:

My mom has been harvesting a few of the wax beans and freezing them so that later she can make a canned three bean salad with a couple of the other beans we planted. Also, she has been harvesting a few cucumbers and making small batches of pickles out of them.


The lettuces are looking lovely in spite of the heat. We are keeping them well watered and using t hem quickly. They have not started to bolt yet! In order to keep the lettuce very fresh we pull it up roots and all and chill it in the fridge until it is ready to eat. It seems to be fresher that way.The deer tongue lettuce and speckled romaine are very tasty and seem to be especially nice. They are part of a mix that we bought from Seed Savers Exchange. They are two that we'd like to grow again.

We have finished up making applesauce from the remaining Transparent apples. My mom made 22 quarts of applesauce the other day! There are other apples that are ready later on that we'll use for making more cider. She decided to can the applesauce outside using the campstoves just as we had done for the apple cider. It makes less of a mess (no sticky counters or floors!) and tends to be cooler than in the kitchen. She even brought her mixer outside to do the pureeing of the sauce.

We'll be back with more gardening news soon!

Sunday, August 15, 2010

Berry Best Birthday Pie!

This Saturday, August 14, 2010 we celebrated my Dad's birthday here at our house with a barbecue and some lovely summer berry pie! I asked my Dad what kind of fruit dessert he wanted and he told me that he wanted a berry pie. When I went to the farmer's market this Saturday there were so many delicious berries I couldn't choose- so I chose to make berry pie that included strawberries, blackberries, blueberries and raspberries! It is such a treat this time of year to be able to enjoy all of these! Below is a picture of my Dad with my son Adam and his birthday pie!


Again, I made my all butter pie crust and some different heart cut outs for this pie. I decided to combine a couple of thickening techniques for the filling of the pie and I was very pleased with the result. I began to think of the rhubarb custard pie which has 2 eggs and just a bit of flour to thicken the filling, so I wanted to try something similar for this pie. I decided to use tapioca flour since it is so smooth and not lumpy as well as some eggs in the filling.

This pie set up really well, and it was delicious! It let the true berry flavor come through without too much sugar!

Here is the recipe and my notes:

Quadruple Berry Pie:

-all butter crust + cut outs for a 9 inch pie shell

1 cup blueberries
1 cup strawberries- cut up into pieces
1 1/2 cups raspberries
1 1/2 cups blackberries
1/4 cup tapioca flour
1/2 cup sugar
2 eggs

All Butter Pie Crust:

Pie Crust: Makes 2 large (10 inch) or 3 small (8 inch) single crust pies. ( I prefer my crust to be fairly thick and have a lot of room for crimping around the edge.)

5 cups all purpose flour
2 teaspoons salt
2 teaspoons sugar
1 pound- 4 sticks cold butter cut into small pieces
1 cup ice water

Mix dry ingredients together in a food processor. Cut in butter until coarse crumbs appear. Pour in ice water slowly until combined. Make 2 large disks out of the dough & wrap in plastic. Refrigerate at least 1 hour. After 1 hour let dough set on counter for about 15 to 20 minutes until pliable.

May be frozen as dough or made into pie crusts & frozen.

After your pie shell and cut outs are made (I made little heart cut outs but you may use any shape you like) proceed with the pie filling:

Pie Filling:

1. Put all of the berries into a large colander and rinse clean. Make sure to drain all of the water out.

2. Then, pour them into a bowl and mix with tapioca flour and sugar. Let them sit for about 5 minutes.

3. Drain off 1/2 cup or more of extra juice after this process. Then add eggs and mix.

4. Pour this mixture into the pie shell, top with pie dough cutouts. Top the cutouts with sugar.

5. Bake the pie at 375F in a regular oven for 25 minutes or in a convection oven at 350F for 30-40 minutes. Make sure that the crust browns evenly but does not get over-browned.

When I made this pie I drained off extra liquid after I mixed in the eggs, but I think it would be better if done beforehand. I was pleased that the pie did not leak over the sides too much because I drained some extra liquid off.


Enjoy your pie!

Cider Rules!

This Friday, August 13th we-- ( my mom, dad, Adam and my sister in law Kim) decided to make some apple cider! We wanted to make the most of what we had in the orchard this year and used up the rest of the Transparent apples to make apple cider. There were about 3 more buckets worth of apples on the tree and we were able to pick those up off of the ground after my Dad shook the tree several times. Adam had fun putting them into the buckets!

Then, we took the apples in the house to wash them with soap and water since they had been on the ground near where deer and bears frequent the orchard looking for extra apples and other goodies. We wanted to make sure they were clean before proceeding.

After that my Dad fired up the motorized cider press that my great grandfather Ernest Huffman built long ago! It still works great! You throw the apples into a hopper in the top and they are chopped into small bits which go into a slatted wooden barrel. Later, after the barrel is full you turn off the motor and begin to manually press the juice out of the apples. Adam got a chance to throw an apple into the hopper! He seemed to enjoy watching the press work when the motor was on, but he was a bit afraid of the pressing part!


Here is my Dad Dale pressing the juice out of the apples:


Later, after you press all of the juice out of the apples then it is time to strain, pasteurize and can the juice. We did all of this outdoors with 2 propane camp stoves.


One stove had the boiling lids, rings and canning jars on it and the other one had the juice on it.


This system worked quite well! We ended up making 16 quarts of juice that day! My sister in law Kim also helped us. It sure was fun and the juice was delicious!

Tuesday, August 10, 2010

The Apple of My Eye


It has been a while since we have written about our garden because we have taken small vacations to the forest and the coast. However, we are back now to tell you all about our early harvests, preserving ventures and how are garden is growing.


Last Friday morning- August 6, 2010 I brought Adam out to visit the garden and orchard here at my parent's place and we decided to pick apples so that we would be able to make applesauce. The orchard did not do well this year due to our very wet and cold spring and early summer. The only tree that really produced anything was the Transparent Apple tree. Wanting to make the most of what we had, my Dad cut two large branches out of the top of the tree for us to harvest apples off of them and also to prune the tree and let more light in. Adam loved learning how to "polish" and apple on his shirt to clean it before he ate it and also had fun eating a small apple while we picked ours. We ended up picking three large buckets of apples off of one branch! One of the buckets of apples is pictured above. I took those apples home and so far out of one bucket I have made 5 quarts and 2 pints of applesauce! I plan on making more applesauce and some spiced apple butter this week with the rest.


This Tuesday, August 10th, 2010- my Dad Dale's birthday- I came out again to visit, take my parents out to lunch and work in the garden. In the morning we took a tour of the garden to see what progress had been made. It has been fairly cold these past few days- very unusual for August. It has been in the 60's in the mornings which is difficult for our garden plants- especially for the tomatoes and peppers. But, as you can see above, many tomatoes are forming on the vines.


Despite the cooler weather many plants are doing quite well and continue to grow. Our cabbages are starting to form in the centers. They look so pretty with their deep purple color.

Also, many tomatoes are starting to form and most of our tomato plants are very large. There are two or three varieties with tomatoes on them already- a good sign!


Our basil (pictured above) is smelling so good and is growing quite nicely in big bunches. Our lettuce, beets, carrots and kale are also coming along. Everything is a bit smaller than it would be had we been able to plant it earlier in the season and had we had a warmer spring and summer- but all in all things are doing well. Our beans are also flowering- many with pretty purple and red flowers!

The squash are really starting to bloom and look very healthy- so we have high hopes of harvesting many of them in the fall.


Also, our grapes are really starting to get bigger and hopefully later on we'll be able to make some delicious grape juice!


Luckily, even though our orchard only produced one kind of apple this year and no pears, plums or cherries- we will have plenty of wild blackberries. Adam sure had fun picking his own with Grandma's help as you can see in the picture below!


We are so thankful that we'll have plenty of berries to freeze and also we plan on making some juice and syrup from them. We will harvest as many as we can!


Suburban Garden Report:

My little suburban garden is doing quite well! The rhubarb continues to grow very well- I need to harvest some soon to freeze and perhaps make some preserves out of. Also, we are getting a few strawberries to eat almost daily- which is delicious and fun!


Our pumpkins are doing great! There are four large pumpkins on the vines and they are starting to turn yellow/orange! They are so pretty and keep getting bigger. My sweet potato plants in the same raised bed planter have grown a bit but probably don't like the cooler weather we've been having!


In another raised bed where I have some very young blueberry bushes all of the sudden a mystery melon or squash plant came up! It looks very healthy and has been growing a lot. It'll be interesting to see what becomes of it! I'm guessing it grew out of something in some of the compost that we put in that planter. Amazing!

Happy Gardening...a post about baking/food will be coming later on!

Monday, August 2, 2010

Blueberry Bagels!


This week I really wanted to be able to add fresh blueberries to bread and still be able to toast it for breakfast. This is quite difficult but I think I may have found the trick in making these bagels.


I used a recipe that I found on the blog The Fresh Loaf which was adapted from the book The Bread Bakers Apprentice.

Here is my version of the recipe along with my notes.


Light Whole Wheat Cinnamon Blueberry Bagels-
- Adapted from The Bread Bakers Apprentice

Makes: 12-17 bagels (I made 17 bagels with 1 recipe)

Sponge:
1 teaspoon instant yeast
4 cups bread flour
2 1/2 cups water- warm from the tap

Dough:
1/2 teaspoon instant yeast
2 cups bread flour
2 cup whole wheat flour
2 3/4 teaspoons salt
2 teaspoons malt powder
OR
1 tablespoon malt syrup, honey, or brown sugar- I used honey

Mix in struesel:
1/4 cup sugar
1/4 cup all purpose flour
6 tablespoons softened butter
1 teaspoon cinnamon

1 cup frozen blueberries. ( I bought fresh ones, washed them and put them in a freezer bag when my dough was just about done- about 20-30 minutes later they were frozen enough to put into the dough)

Finishing touches:
1 tablespoon honey for the water
Cornmeal for dusting the pan
Egg wash for the bagels- 1 egg- beaten mixed with 1-2 tablespoons water

The Night or Late Afternoon Before:

Stir the yeast into the flour in a large mixing bowl. Add the water and stir until all ingredients are blended. Cover with plastic wrap and allow to rise for two hours. As you can see in the photo above the sponge gets very bubbly.- I let it rise slightly longer than two hours because I wanted to finish eating dinner before I made the dough. I think that any recipe that starts with a sponge is going to turn into a lighter, fluffier, more flavorful bread because it seems like the yeast gets a good head start in rising.

Remove the plastic wrap and stir the additional yeast into the sponge. Add 2 cups of the flour, the 2 cups of whole wheat flour, the malt powder or honey and the salt into the bowl and mix until all of the ingredients form a ball. You may need to work in the additional 3/4 cups of flour to make the dough less sticky, either while still mixing in the bowl or while kneading. The dough should be stiffer and drier than normal bread dough, but moist enough that all of the ingredients are well blended.

At this point I also made the struesel by mixing together the butter, flour, sugar and cinnamon in a small bowl.

Knead each half of the dough for about 10 minutes on a floured board. After the dough is kneaded work in small bits of the struesel mixture and mix in well to create a "swirled" cinnamon dough.

Right after kneading, divide the dough into a dozen small pieces around 4 1/2 ounces each. I used a kitchen scale to measure out each ball. If you don't have a kitchen scale, try to divide the dough as evenly as possible into 12-14 pieces. Roll each piece into a ball and set it aside. When you have all 12 pieces made, cover them with a damp towel and let them rest for 20 minutes.

Shaping the bagel is very simple. Punch your thumb through the center of each roll and then rotate the dough, working it so that the bagel is as even in width as possible. As you shape the bagels "poke" in several frozen blueberries into each bagel. I left some of the bagels plain too.

Place the shaped bagels on an oiled sheet pan or pans, with an inch or so of space between one another. If you have parchment paper, line the sheet pan with parchment and spray it lightly with oil or pan spray before placing the bagels on the pan. Cover the pan with plastic wrap and allow the dough to rise for about 20 minutes.

After about 20 minutes of rising time, place the baking sheets in the refrigerator overnight. This will develop the flavor in the bagels. This time with the blueberry bagels I forgot to do the extra 20 minute rising, I think that is why they are not as round and puffy, but they are still yummy!

The Next Morning:

Preheat the oven to 500F. I decided to use the convection feature on my oven- so it was set at 475F. Bring a large pot of water to a boil. Add one tablespoon of honey to the pot.

When the pot is boiling, drop a few of the bagels into the pot one at a time and let them boil for a minute. Use a large, slotted spoon or spatula to flip them over and boil them on the other side.

Before removing them from the pot, sprinkle corn meal onto the sheet pan. Remove them one at a time, set them back onto the sheet pan. At this point you can top the bagels with seeds, etc. if you wish while they are still wet. Otherwise you can leave them plain, or brush an egg wash on them.

Place the sheet pan into the preheated oven and bake for 5 minutes. Reduce the heat to 450 degrees, (or 425 in a convection oven) rotate the pan, and bake for another 5 minutes until the bagels begin to brown. Remove the pan from the oven and let cool. I let the bagels bake a total of 15 minutes with a couple of rotations because the temperature was a bit lower and I wanted them to brown a bit more.

Enjoy! Below is a picture of my split and buttered bagel. Yum! These bagels were very light, moist and flavorful. I might experiment with putting a blueberry compote in them or something else another time, but overall they were great!

Peach Love


I love this time of year here in Oregon when the farmer's markets are filled with so many local fruits and vegetables it is hard to choose and hard not to overbuy because everything looks so fresh and delicious! It is because of the local peaches that are now in season that I wanted to make this peach pie. Also, I was on the search for the perfect, simple peach pie recipe and I think I have found it in the one that I adapted which I'll share below.

I have wanted to bake more with honey and so I decided to try a honey peach pie recipe that I adapted a bit. I got the original recipe from a baking book my Mom found for me called "The Harrowsmith Country Life Baking Book"- edited by Sandra J. Taylor. Here it is:

Peach Honey Pie:

Makes: One 10 inch pie

1 10 inch pie shell + decorative cut outs for the top


All Butter Pie Crust:

Pie Crust: Makes 2 large (10 inch) or 3 small (8 inch) single crust pies. ( I prefer my crust to be fairly thick and have a lot of room for crimping around the edge.)

5 cups all purpose flour
2 teaspoons salt
2 teaspoons sugar
1 pound- 4 sticks cold butter cut into small pieces
1 cup ice water

Mix dry ingredients together in a food processor. Cut in butter until coarse crumbs appear. Pour in ice water slowly until combined. Make 2 large disks out of the dough & wrap in plastic. Refrigerate at least 1 hour. After 1 hour let dough set on counter for about 15 to 20 minutes until pliable.

May be frozen as dough or made into pie crusts & frozen.

After your pie shell and cut outs are made (I made little heart cut outs but you may use any shape you like) proceed with the pie filling:

Pie Filling:

3 pounds peaches- peeled and sliced
1/4 cup butter
2 tablespoons tapioca flour
1/4 cup honey
1/4 teaspoon salt
2 teaspoons cinnamon
1/4 teaspoon nutmeg


Melt the butter in a large frying or saute pan. Add the sliced peaches and saute for about 10 minutes. Then, pour this mixture into a large bowl and add the tapioca flour, honey, cinnamon, nutmeg and salt. Stir to mix well. Pour into pie shell. Top with decorative cut outs. Sprinkle the cut outs with sugar.

Bake in a 450F oven for 10 minutes. Then, reduce the heat to 375F and continue to bake for 20 to 25 minutes or until the crust is light brown.

Enjoy! Below is a close up photo of the cut out and the lovely peach filling: